ARMagLock AR-15 Fixed Magazine Lock Installation Photo Guide

ARMaglock Ar-15 Fixed Magazine & Release Solution
ARMagLock
ARMagLock

Winter Park, CO –-(Ammoland.com)- ARMagLock is a new patent pending AR-15 fixed magazine solution. It allows New York, Connecticut, California and new potential Rhode Island AR-15 owners to comply with existing and proposed fixed magazine laws, potentially avoiding assault weapon registration within their respective states. Stay compliant with the laws.

See our legal disclaimer for additional information.

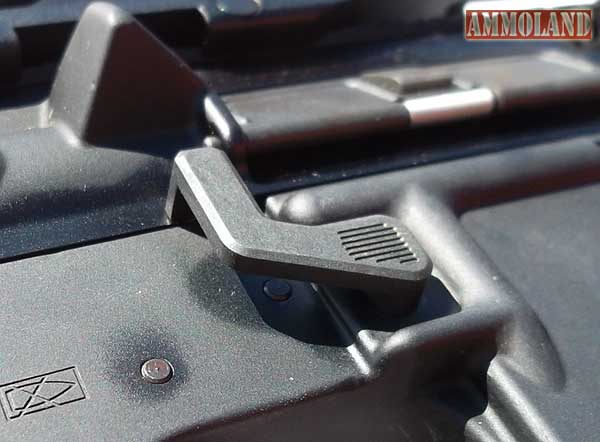
The ARMagLock turns your firearm into a “fixed magazine” firearm that can not release the magazine unless you pull the takedown pin, and separate the upper and lower receivers, thus “disassembling” the firearm action.

Once the receivers are minimally separated, the ARMagLock can be engaged to release the magazine.

After many requests we have produced this illustrated photo guide to installing your own ARMagLock accessory on your own firearm.

You will need the following tools:

  • Pick Tool
  • Screw Driver (small)
  • Bullet Button Tool (optional)
  • Allen Wrench that is included
  • Needle Nose Pliers
  • May need Dremel or file for troubleshooting

Installing the Magazine Catch Bar:

Press The Magazine Release Button
First we will show you how to remove your magazine release button. If you are outside of California, simply press the magazine release button as far as it will go and twist the magazine release catch counter clockwise until it is fully out.
California Bullet Button
For those of you in California that have a Bullet Button, either use a screwdriver if you have a Raddlock, or a bullet button tool to loosen the magazine release button. If you have a factory installed bullet button that is glued in, heat up the bullet button to soften the glue before unscrewing.
In this case we will use a screw driver to remove the magazine release button.
Take your ARMagLock and place the spring on the standoff (cylindrical threaded tube).  Next put into the magazine release button well.
Take your ARMagLock and place the spring on the standoff (cylindrical threaded tube). Next put into the magazine release button well.
Depress the ARMagLock completely into the magazine release button well.
tighten the cap screw on firml
On the left side of the firearm, tighten the cap screw on firmly, but do not tighten all the way. Line up the ARMagLock so that the top lip is flush with the upper receiver. While holding it in place, with you Allen wrench tighten the cap screw until snug.
Tighten with an Allen Wrench

Notes for troubleshooting:

1. After installation of the ARMagLock the button is loose in the lower, to the degree that the magazine can be removed without separating the upper and lower receiver and pushing the button.

a. It should be tight enough that the magazine catch bar keeps magazines from being pulled out even with force, just like an OEM magazine catch. Tighten the cap screw until the desired fit is acquired.

2. After installation of the ARMagLock the button is tight in the lower, to the degree that the lip is jamming between the upper and lower receivers when attempting to close them.

a. It should be tightened to the point that the magazine catch bar holds magazine in place but not so tight it jams the upper bar between the upper and lower. If the required tightness for magazine retention continues to place the upper bar between the upper and lower receives when attempting to close, remove a few thousands of an inch (with a Dremel, light file or sand paper) off of the upper edge. (see image below) Continue until the upper lip is flush with the upper receiver when closed.

Remove a few thousands of an inch off of the upper edge.

Replacement of Rear Takedown Pin:

The easiest way to remove your takedown pin without undoing the castle nut and stripping the staking is to do the following. Pull the rear takedown pin and open the receiver.

Push the takedown pin back in slightly to disengage it from the detent pin.
Use your pick tool to push the detent pin back into the lower receiver to clear it for removing the takedown pin.
With the detent pin held back, fully remove the takedown pin. The detent pin will stay seated in the detent channel.
Use your pliers to pull the detent pin back until you can hold it in place using your flathead screwdriver.
takedown pin hole
Now take your flathead screwdriver and insert it through the left side takedown pin hole. Push the detent pin back into the detent channel in the lower receiver with your screwdriver. Ensure you keep the head of the screwdriver perpendicular to the floor.
custom made ARMagLock takedown pin
Quickly insert your custom made ARMagLock takedown pin while holding the pin back.
Perform a function test to ensure your ARMagLock is working properly.

Thank you for purchasing ARMagLock!

ARMagLock Operation Video

Visit ARMagLock Inc AR-15 Fixed Magazine Lock & Release Solution. www.armaglock.com